Table of Contents
PIC18: a guide to assembling, linking and programming with Linux
 Have you ever wondered how to program Microchip PICs in assembly under Linux? Here's a quite in-depth introduction that tries also to show the inner workings of the PIC18 family architecture.
We'll start to see how modular assembly is using relocatable code and how cool it is working at this low level, so low that we can understand how PICs think and work!
What is relocatable code?
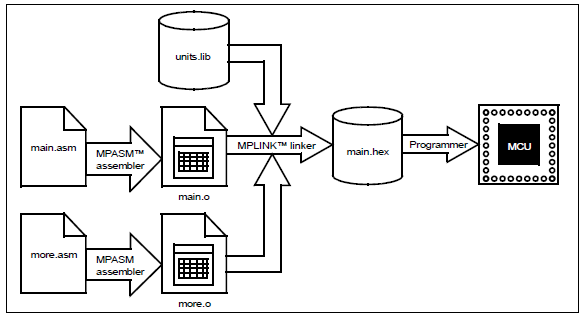
With absolute code the assembler directly generates a .hex file:
Relocatable code permits the generation of object reusable modules (.o files) that can be linked together to form the final executable code:
Rather than having a huge .asm file, with all the routines that manage, for instance, the LCD, I2C bus, serial and so on specified in it, we can create different object module (one for the LCD routines, one for the I2C bus, …) that we can reuse in future projects.
Gputils installation
First of all let's install the necessary tools. Assembler, disassembler and linker executables are part of a suite named gputils. So as root (or by prepending sudo):
# apt-get install gputils
Source
Let's start with an assembly source which will have to be created in its own directory:
~/pic-projects/test001$ less test001.asm
with the following content:
	;*******************************************************************
	; test001
	;*******************************************************************

		RADIX DEC
		ERRORLEVEL  0, -302
		INCLUDE <p18f4550.inc>

	; Program begins here
	.rst CODE 0x00          ; Beginning of a ABSOLUTE PROGRAM CODE section (.rst)
							;  The starting address (0x00) is declared explicitly
			goto Start

	.high_int CODE 0x08
			nop

	.low_int CODE 0x18
			nop

	.start CODE                ; Beginning of a RELOCATABLE PROGRAM CODE section (.start)
							;  The starting address is not specified, so it
							;  will be assingned during the linking phase (with gplink)

	Start
			movlw 0x55      ; WREG = 0x55

	; Main loop
	Main

			goto Main

			END
Let's have a look at some interesting lines of code we have here; first the directive CODE specifies the beginning of a program code section.
.rst CODE 0x00
It has got a label (.rst) and the indication of the location (0x00) where the portion of code, up until the next occurrence of a CODE directive (which will identify another program code section), has to be saved. That's similar to the org directive.
The 0x00 corresponds to the Reset Vector, so that's the location where the micro goes to when it boots or resets; the first instruction it executes is goto Start. Why is that? Because we need to tell it to jump over the two locations where the PIC goes whenever an interrupt occurs: 0x08 for high priority and 0x18 for low priority interrupts. By default the interrupt priority feature is disabled, so in compatibility mode interrupt force the PIC to go to location 0x08. Interrupt sections are also defined as program code.
Then we have the last program code section for the Start portion; there's a label (.start) but … Hey, where's the location? That's intentionally left blank, because it will be set later by the linker, as we will soon see. This last section simply tells the micro to write the literal value 0x55 in the WREG registry and then to loop. That's what this simple program does.
Assembling
Ok, cool; now to compile our source we fire up the assembler like this:
~/pic-projects/test001$ gpasm -c -p 18F4550 test001.asm
where:
-c = creates relocatable code
-p = selects the micro
Note that the last one is different from the INCLUDE <p18f4550.inc> directive that we have specified in the .asm source; the -p tells the assembler the micro we are using, marking the object file (.o) with that indication, so that the next operation of linking is already aware of the settings it has to arrange by default; on the other hand the *.inc file contains a long list of equivalences, like this one:
PORTA EQU H'0F80'
So if we want to toggle a bit of PORTA we don't have to remember the location (0x0F80) of that peculiar Special Function Register (SFR) in Data RAM. Besides we can include many other header files.
The above command produces the following files in our project directory:
  ~/pic-projects/test001$ ls -l
  total 48
  -rw-r--r-- 1 roberto roberto   724 2012-08-22 13:47 test001.asm
  -rw-r--r-- 1 roberto roberto 40104 2012-08-22 13:45 test001.lst
  -rw-r--r-- 1 roberto roberto   787 2012-08-22 13:45 test001.o
Besides test001.asm there is the binary object file, test001.o, which doesn't make a lot of sense to human beings (but a lot to micros) and test001.lst, which shows the correspondence between our code (on the left) and how it is translated by the assembler (on the right). Let's have a look at some extracts from that list file.
  LOC  OBJECT CODE   LINE	SOURCE TEXT
  0000 EF00 F000     00013	goto Start
The first column represents the location in program memory; the third column (let's skip the 2nd one - OBJECT CODE - for the moment) is the line in the source code; lastly there is the source code that we typed in the .asm file.
So, the second column represents actual machine code in hexadecimal (EF00 F000); if we take a look at the datasheet and search for the opcode for the GOTO command we see that it is a two-word instruction; a word for PIC18 is two bytes, so a two-word instruction occupies four bytes.
As we can see the second word is a special NOP, that gets executed if the first word is skipped for some reason (see example 5.4 in the datasheet); the second word is needed to reach all program memory locations, because it contains 12 bits which are the higher bits of the destination address of the GOTO statement; the lower 8 bits are in the first word. That's a total of 20 bits.
Program memory organization
Let's digress a while and see what the datasheet for the 18F4550 says on program memory:
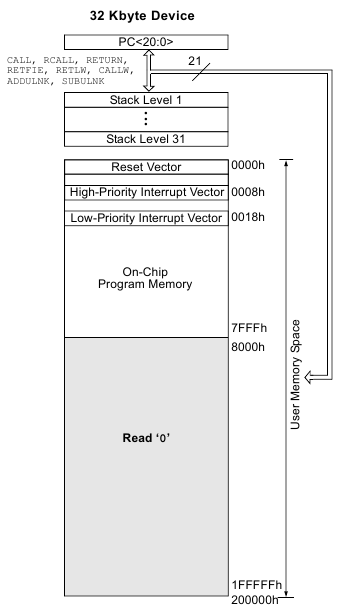
PIC18 microcontrollers implement a 21-bit program counter which is capable of addressing a 2-Mbyte program memory space.
And then:
The PIC18F2550 and PIC18F4550 each have 32 Kbytes of Flash memory and can store up to 16,384 single-word instructions.
So 2Mbytes is the maximum theoretical address space (2 ^ 21bit = 2,097,000 addressable locations) and 32Kbytes (7FFFh) is the physical implementation for the 18F4550 micro; every instruction (a word) takes two bytes, so 16,384 is the number of single two-byte instructions (that is, not counting GOTO, CALL, etc… which are two-word instructions) the flash memory can contain.
So while there's no problem with a PIC 18F4550, because it just needs 14 bits to reach all the 32K program locations (2 ^ 14bits = 32Kbytes) with a GOTO (or CALL…), Microchip could build a PIC which could physically address all the 2Mbytes; and that would be a problem, because the two words that form a GOTO function only give 20 bits of the needed 21. The 'solution' is the way instructions are saved in program memory.
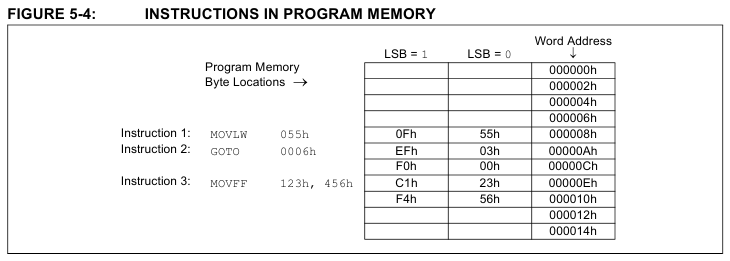
As we can see in the above pictures, the program counter is incremented by two (starting from 0000h) and so the word address, that is the address of a word instruction, is always the even byte. That means that the least significant bit (LSb) of the even byte, which corresponds to the word address, is always '0'; and this LSb, which will be always '0', is just the last bit that we need to form a complete 21-bit address:
That explains why in figure 5-4 above GOTO 0006h is translated into EFh 03h in machine code; EFh is the opcode of GOTO, 03h represents the lower bits of the address to which we have to add the LSb which is always '0':
A LSb will always read '0' and won't be specified in a GOTO or CALL instruction; the operation above corresponds to a left shift (the notation being 03h « 1) and is equivalent to multiplying the operand by two.
The fact that we can directly address all program memory means that with the PIC18 we don't have to worry about paging, which is a mechanism that lower PICs (PIC10, 12, 16) adopt to address program memory that cannot be specified in a GOTO or CALL instruction; in a GOTO instruction of a PIC16, for instance, there are only 11bits left for the address location, so we have to be careful with GOTOs or CALLs to set the proper bits in a register (or with a 'pagesel' instruction) in order to add the remaining bits of the address. It's something similar to RAM bank selection, where we have to set the RP<1:0> bits of the STATUS register to access different registers; the good news is that with PIC18 we don't have to worry about bank switching as well, thanks to ACCESS banks (as we will see later).
Going back to our list file (test001.lst) and to the 'interesting' part we can see a bunch of odd things:
  0000 EF00 F000 00013         goto Start
  0008 0000      00016         nop
  0018 0000      00019         nop
  0000           00025 Start
  0000 0E55      00026         movlw 0x55
  0002           00029 Main
  0002 EF00 F000 00031         goto Main
- the first GOTO just doesn't make sense: it contains the address of 000000h and not the address of the 'Start' label - the address of the 'Start' label is also 0000h - the goto Main is also 000000h
The fact is that the object file (test001.o) that we created before represents a sort of intermediate semifinished file. We declared the .Start section a relocatable one, because we didn't specify an address for it; it will be up to the linker to take all the object files (in this case we only have one) and, by using the appropriate .lkr file, create an .hex file and assign all the sections to the correct address locations. Once the .Start section will have its correct address location goto Start and goto Main will be assembled with the correct addresses for the labels.
Linking
So let's do the actual linking:
  ~/pic-projects/test001$ gplink -m -c *.o -o test001.hex
  message: using default linker script "/usr/share/gputils/lkr/18f4550.lkr"
where:
-c generates relocatable code
-m generates a .map file
-o name of the output .hex file
If we don't specify a .lkr file the linker knows that it has to fetch the same file that corresponds to the processor that was applied to the .o file when it was assembled (remember the -p 18F4450 in the gpasm command?); that file is in the /usr/share/gputils/lkr/ directory and here is its content:
    CODEPAGE   NAME=page       START=0x0               END=0x7FFF
    CODEPAGE   NAME=idlocs     START=0x200000          END=0x200007       PROTECTED
    CODEPAGE   NAME=config     START=0x300000          END=0x30000D       PROTECTED
    CODEPAGE   NAME=devid      START=0x3FFFFE          END=0x3FFFFF       PROTECTED
    CODEPAGE   NAME=eedata     START=0xF00000          END=0xF000FF       PROTECTED

    ACCESSBANK NAME=accessram  START=0x0            END=0x5F
    DATABANK   NAME=gpr0       START=0x60           END=0xFF
    DATABANK   NAME=gpr1       START=0x100          END=0x1FF
    DATABANK   NAME=gpr2       START=0x200          END=0x2FF
    DATABANK   NAME=gpr3       START=0x300          END=0x3FF
    DATABANK   NAME=usb4       START=0x400          END=0x4FF          PROTECTED
    DATABANK   NAME=usb5       START=0x500          END=0x5FF          PROTECTED
    DATABANK   NAME=usb6       START=0x600          END=0x6FF          PROTECTED
    DATABANK   NAME=usb7       START=0x700          END=0x7FF          PROTECTED
    ACCESSBANK NAME=accesssfr  START=0xF60          END=0xFFF          PROTECTED
CODEPAGE lines specify the available flash program memory locations (0x0 - 0x7FFF) and the protected ones, used by configuration bits and EEPROM; ACCESSBANK and DATABANK specify available RAM memory and USB and SFR space. So, by using this .lkr file, and specifically the first CODEPAGE line, the linker knows where it can put relocatable code sections.
The linking process produces a bunch of other files:
- one .cod and one .cof binary file, which are used for debugging - one .hex binary file, which can be programmed onto the PIC - one .map file; this is interesting because it shows the beginning, size and end of the various CODE sections and the addresses of the labels (Start,Main) specified in the .asm files:
                                 Section Info
                  Section       Type    Address   Location Size(Bytes)
                ---------  ---------  ---------  ---------  ---------
                   .org_0       code   00000000    program   0x000004
                .high_int       code   0x000008    program   0x000002
                   .start       code   0x00000a    program   0x000006
                 .low_int       code   0x000018    program   0x000002

                              Program Memory Usage
                               Start         End
                           ---------   ---------
                            00000000    0x000003
                            0x000008    0x000009
                            0x000018    0x000019
                            0x00000a    0x00000f

                            7 program addresses used

                              Symbols
                     Name    Address   Location    Storage File
                ---------  ---------  ---------  --------- ---------
                    Start   0x00000a    program     static test001.asm
                     Main   0x00000c    program     static test001.asm
- one new .lst file (comments in the .asm files are present, but not listed below):
      Address  Value    Disassembly	Source
                   .rst CODE 0x00
      000000   ef05     goto  0xa		goto Start
      000002   f000
                    .high_int CODE 0x08
      000008   0000     nop			nop
                    .low_int CODE 0x18
      000018   0000     nop			nop
                    .start CODE
                    Start
      00000a   0e55     movlw 0x55	movlw 0x55
                    Main
      00000c   ef06     goto  0xc		goto Main
      00000e   f000
                   END
The linker placed the '.start' label into 00000Ah location; that is reflected by the first GOTO, goto 0xA, translated into machine code EF05 (EF opcode for GOTO instruction, 05 lower bits of the address to which we have to add the LSb '0' in order to form the final address destination of 0xA - see above) and by the next GOTO, goto 0xC, translated into EF06 (which has to be left-shifted by one or multiplied by two to get the real address location of 0xC).
Separate relocatable modules
Relocatable code comes in handy when we have subroutines that we often need. For instance, let's suppose we want to toggle an LED on/off; we want to use a delay, but we wouldn't want to retype or copy and paste delay code from another project. It would be great if we could use a separate file to be included in our project which contains the delay routines; that can be easily done with relocatable code.
So, first of all, let's create a new .asm code which does the toggling of the LED:
~/pic-projects/led001$ nano led001.asm
with the following content:
     ;*******************************************************************
    ; led001
    ;*******************************************************************

    #define LED0 PORTD,0

	RADIX DEC
	ERRORLEVEL  0, -302
	INCLUDE <p18f4550.inc>

	EXTERN msDelay              ; Uses a label defined in another (external) module

	CONFIG      FOSC=HS         ; High frequency clock
	CONFIG      WDT=OFF         ; Watchdog timer disabled
	CONFIG      PBADEN=OFF      ; Analog inputs disabled
	CONFIG      LVP=OFF         ; Low voltage programming disabled


    ; Program begins here
    .rst CODE 0x00          ; Beginning of a PROGRAM CODE section (.rst)
			    ;  The starting address (0x00) is declared explicitly
	    goto Start

    .high_int CODE 0x08
	    nop

    .low_int CODE 0x18
	    nop

    .start CODE             ; Beginning of a PROGRAM CODE section (.start)
			    ;  The starting address is not specified, so it
			    ;  will be assingned during the linking phase (with gplink)

    Start

	    clrf LATA
	    clrf LATB
	    clrf LATC
	    clrf LATD
	    clrf LATE

	    movlw 0Fh       ; All ports digital, not analog
	    movwf ADCON1

	    movlw 07h       ; Comparators disabled
	    movwf CMCON


	    movlw b'11111111'       ; Configure PORTA lines
	    movwf TRISA
	    movlw b'11111111'       ; Configure PORTB lines
	    movwf TRISB
	    movlw b'11111111'       ; Configure PORTC lines
	    movwf TRISC
	    movlw b'00000000'       ; Configure PORTD lines
	    movwf TRISD
	    movlw b'11111111'       ; Configure PORTE lines
	    movwf TRISE


    ; Main loop
    Main
	    btg LED0        ; BTG LED0 (PORTD,0)
	    movlw .250      ; Load W register with DEC 250
	    call msDelay    ; Call external routine

	    goto Main

	    END
With this line
EXTERN msDelay
we are telling the assembler that msDelay is a label declared in another module:
~/pic-projects/led001/delay20Mhz.asm
which contains the following routines:
     ;********************************************************
     ; delay20mhz.asm
     ;********************************************************

	    RADIX DEC
	    INCLUDE "p18f4550.inc"


    ;@20Mhz Fosc/4=5Mhz
    ; 5000000 instruction/sec
    ; that is 1 instruction every 0,2uS (1/50000000)

	    GLOBAL msDelay,usDelay  ; Makes msDelay e usDelay labels, defined in this module, available to other modules

	    UDATA_acs               ; By declaring the following variables as UNINITIALIZED DATA_ACS
    msDelayCounter0 res 1           ;  we don't have to worry about their location in data memory or that they
    msDelayCounter1 res 1           ;  conflict with other variables declared in other modules


    .MSUSDELAY CODE                 ; Beginning of a PROGRAM CODE section (.MSUSDELAY)
				    ;  The starting address is not specified, so it
				    ;  will be assingned during the linking phase (with gplink)

    ;********** msDelay **********
    msDelay
	    movwf msDelayCounter1
    Delay1mS
	    movlw d'250'
	    movwf msDelayCounter0

    Delay4uS
	    ; A total of 4uS:
	    goto $ + 4      ; 2 cycles (0,4uS)
	    goto $ + 4      ; 2 cycles (0,4uS)
	    goto $ + 4      ; 2 cycles (0,4uS)
	    goto $ + 4      ; 2 cycles (0,4uS)
	    goto $ + 4      ; 2 cycles (0,4uS)
	    goto $ + 4      ; 2 cycles (0,4uS)
	    goto $ + 4      ; 2 cycles (0,4uS)
	    goto $ + 4      ; 2 cycles (0,4uS)
	    nop             ; 1 cycle (0,2uS)
	    decfsz msDelayCounter0,F        ; 1 cycle (0,2uS)
	    goto Delay4uS   ; 2 cycles (0,4uS)

	    ; When it arrives here 1mS has passed
	    decfsz msDelayCounter1,F
	    goto Delay1mS

	    ; When it arrives here the mS specified in W, before the msDelay call, have passed
	    return


    ;********** usDelay **********
    usDelay
	    movwf msDelayCounter1

    Delay1uS
	    goto $ + 4      ;2 cycles (0,4uS)
	    decfsz msDelayCounter1,F        ; Normally 1 cycle (0,2uS)
	    goto Delay1uS                   ; Normally 2 cycles (0,4uS)

	    ; When it arrives here the uS specified in W, before the usDelay call, have passed

	    return

	    END
The instruction
goto $ + 4
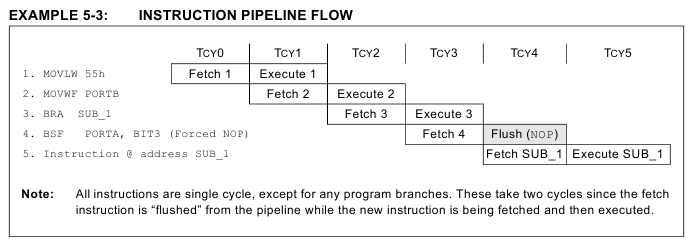
is basically just a time waste unit: we use because is one of the instructions that wastes more time. This goto, as all program branches, takes 2 cycles to complete:
It's important to note that even single word instructions like BRA (as shown in the above example) take 2 cycles to complete: that's because a new instruction after the program branch has to be fetched again (in the example instruction 4 has to flushed and SUB_1 has to be fetched).
The goto $ + 4 points to another similar located in 0x28 ($ is the present location) and so on.
                                         Delay4uS
                                              ; A total of 4uS:
   000020   ef12     goto  0x24                    goto $ + 4      ; 2 cycles (0,4uS)
   000022   f000
   000024   ef14     goto  0x28                    goto $ + 4      ; 2 cycles (0,4uS)
   000026   f000
   000028   ef16     goto  0x2c                    goto $ + 4      ; 2 cycles (0,4uS)
So the purpose of our delay sub is to add delay after delay to reach a total of 4us, which is cycled 250 times, to form a 1ms delay. This 1ms delay is then multiplied by the value which has been loaded before into the W register: so to have a delay of 250ms we have first to load W reg with .250 (250 in decimal) and then call msDelay subroutine.
Using BRA instead of GOTO
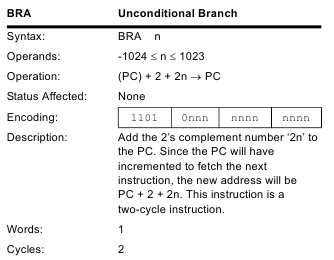
The difference between BRA and GOTO is that BRA is a relative jump from current position to anywhere within +1023 and -1024 locations, while GOTO is an absolute jump within the available program locations on the PIC.
If we take a look at BRA in the datasheet here's how the instruction looks like:
We got 11 bits for our program counter to jump to; but as said they don't represent an absolute program location. Even if in the assembly source we specify a target label, just like in GOTO, the assembler converts it in a relative, positive or negative, offset from the current location to the target location; if the target location is forward the offset will be positive and if the target location is backward the offset will be negative.
But how can we represent negative numbers? The most used way is two's complement; there are a couple of great videos that explain that concept. Basically, since there's no room to put a minus sign, this means that there isn't a negative number representation per se, but it's dependant on the instruction that's dealing with the number; for instance the instruction GOTO interprets the value 9Eh (10011110 in binary) as decimal 158, while the instruction BRA interprets the same number as -30 in decimal.
With 11 bits we have 2^11 (2048) different values, half of which will be interpreted by the BRA instruction as positive and the other half as negative; more precisely if the number has a leading one then it's a negative offset, otherwise it's a positive offset.
Let's take this line as an example:
000034 d7f5 bra 0x20 bra Delay4uS ; 2 cycles (0,4uS)
So 7F5 is the two's complement representation of a negative number (leading bit of the eleven bits is 1) which, after going through a couple of other operations specified in the datasheet, compose an offset that let us go from location 0x34 to 0x20.
   111 1111 0101 (7F5)
   111 1111 0100 (subtract 1)
   000 0000 1011 (flip bits) = -.11 (signed decimal)
   -.11*2 + 2 (see datasheet) = -.20 (signed decimal offset) = -14h (signed hex offset)
   0x34 (current location) - 0x14 (offset) = 0x20 (target location)
The first line is the binary representation of the offset; the second and third are the operations that convert two's complement negative numbers; the fourth line is the operation that the obtained number has to go through, as explained in the datasheet, to obtain the offset; finally the fifth line calculates the target location.
Another example:
     000038   d7f1     bra   0x1c                    bra Delay1mS

     111 1111 0001 (7F1)
     111 1111 0000 (subtract 1)
     000 0000 1111 (flip bits) = -.15 (signed decimal)
     -.15*2 + 2 = -.28 (signed decimal) = -1Ch (signed hex)
     0x38 (current location) - 0x1C (offset) = 0x1C (target location)
So, now that we got two new .asm files, let's do the assembling:
   $ gpasm -c -p 18F4550 delay20Mhz.asm
   $ gpasm -c -p 18F4550 led001.asm
Here are the resulting files (list and object files):
   $ ls -1
   delay20Mhz.asm
   delay20Mhz.lst
   delay20Mhz.o
   led001.asm
   led001.lst
   led001.o
If we take a look at delay20Mhz.lst we see that the relocatable code portions are missing the address location, as we saw before. For instance:
EF00 F000 goto Delay4uS
This line is missing the location of the Delay4uS label; as we know this is something (dealing with program memory assignments) which will be managed later by the linker. But its purpose is also to assign data memory, that is to fit user variables into General Purpose Registers. We see an example of this in the following line:
6E00 movwf msDelayCounter0
Here the assembler translated MOVWF into 6E, but then it didn't write the data address location where to copy W value. Before it was simply declared as uninitialized access data, and assigned 1 byte as reservation. It's up to the linker to save that value in a GPR; but what does 'access data' mean?
Data memory (RAM)
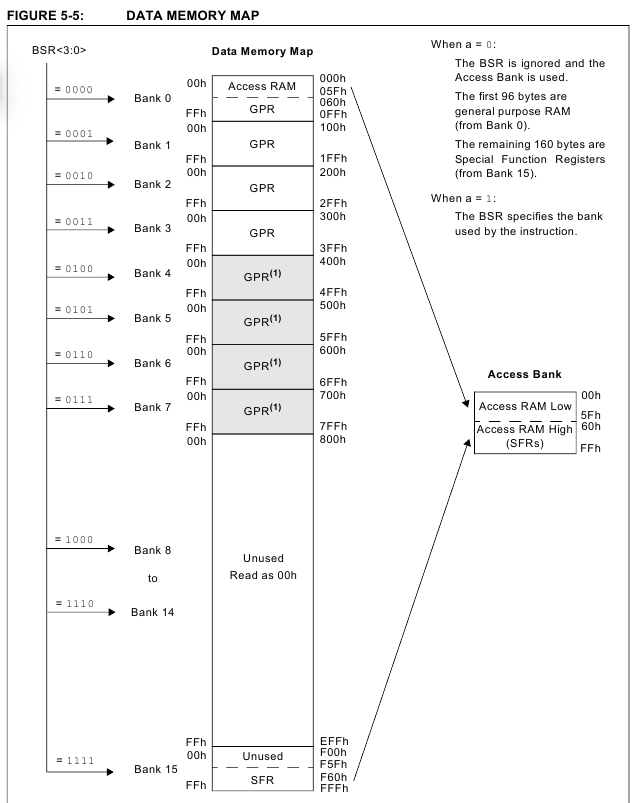
As we briefly mentioned before, PIC18s got another nice feature, named access bank, that let's us get rid of the pain of having to deal with bank switching. If we look at how PIC18 manage byte-oriented (that is GPRs-General Purpose Registers and SFRs-Special Function Registers) instructions we can see that only 8bits are left for the address location of the register (operand), the remaing 8 being used by the opcode.
So to reach all data memory (16 x 256byte banks = 4096bytes = FFFh) normally we should act on a SFR named BSR (Bank Shift Register) and first set the proper 4bits to reach one of the sixteen banks; but, as we see in the next figure, all SFRs and 96 GPRs are mapped to an area location named Access Bank, which is properly 8bit wide (from location 00h to FFh):
That let's give us fast access to SFRs and enough data memory for user variables; furthermore access banking is automatically set by the linker, so in order to use it we don't have to explicitly add it in the source.
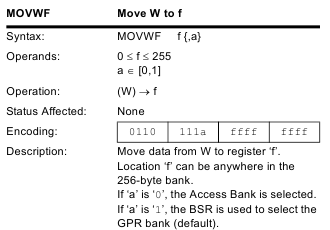
The datasheet says that the default is not to use Access Bank ('a' = 1):
but then for example this is how the linker translated the instruction on the right:
movwf 0x1, 0 movwf msDelayCounter1
with the '0' that means use Access Bank.
Programming
PicKit2 is a cheap and robust hardware programmer for PICs; Microchip provides alsboth program and datao a software command-line tool, named pk2cmd to use it under Linux.
Howto install pk2cmd
First let's connect the PicKit2 to an available USB port and see if the PC sees it:
   $ lsusb
   Bus 004 Device 002: ID 04d8:0033 Microchip Technology, Inc. PICkit2
Then let's download and extract the tarball:
   $ wget http://ww1.microchip.com/downloads/en/DeviceDoc/pk2cmdv1.20LinuxMacSource.tar.gz
   $ tar xzvf pk2cmdv1.20LinuxMacSource.tar.gz
We have to install a bunch of dependencies:
$ sudo aptitude install g++ libusb-dev
Now we can compile the source:
   $ cd pk2cmdv1.20LinuxMacSource
   $ make linux
   $ sudo make install
Let's copy (or symlink) this file to the location where pk2cmd is saved:
$ sudo cp /usr/share/pk2/PK2DeviceFile.dat /usr/local/bin
This is the command line to program our PIC:
   $ pk2cmd -P -M -F led.hex -Y
   Auto-Detect: Found part PIC18F4550.
   PICkit 2 Program Report
   30-8-2012, 14:58:33
   Device Type: PIC18F4550
   Program Succeeded.
   PICkit 2 Verify Report
   30-8-2012, 14:58:33
   Device Type: PIC18F4550
Verify Succeeded.
Operation Succeeded
Where:
-P: auto-detects the device
-M: programs the device (pk2cmd can also read it)
-F: hex file name has to be provided immediately after
-Y: verifies device after programming
Disconnect PicKit2 and the firmware should run; there is also the possibility to let the programmer connected and program the PIC like this:
$ pk2cmd -P -M -F lcd.hex -Y -R
where:
-R: releases /MCLR after operations
The only problem is that, doing that way, pin RB6 and RB7 always read as '0' and so cannot be used, because they are used by the PicKit2 to program the PIC (PGC and PGD).
Script to assemble, link and program
Wouldn't it be cool to have a script that assemble all .asm files, links them and program the PicKit2? Yes, of course! Below you can find the bash script picbuildprog that does exactly that.
Just extract it in a directory like
/usr/local/bin/
make it executable and launch it in the directory that contains the source file.
Conclusion
Now we should have a better understanding how to assemble, link and program a PIC under Linux, using relocatable code. It was an occasion to better understand the underlying program and memory organization in a PIC and to take a peek at some of its inner workings.
The source files used in this article can be found below.


